How do I make a table of contents?
Type / in any note, choose Table of contents, pick a tag, and Harbor puts a list of every note with that tag right there in the note. Tag a new note tomorrow and it shows up in the list on its own. Delete one and it’s gone.
That’s the difference from an index note: an index note is a snapshot of notes you picked by hand, and a table of contents is a live list of whatever carries the tags right now.
Looking for the old feature that builds a new note from a selection? It’s called Index note now. Same feature, new name, same steps.
Adding one
Put the cursor where you want the list and either:
- type / and choose Table of contents, or
- click + in the toolbar and choose Table of contents.
A picker opens:
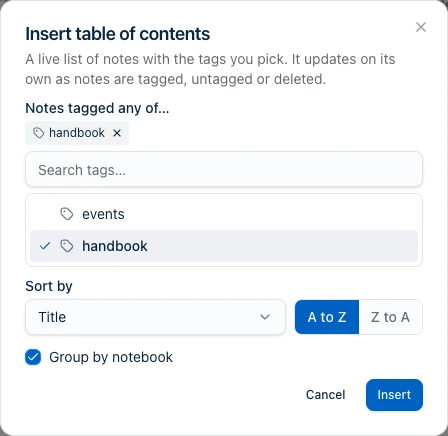
- Pick one or more tags. Search for them or click them in the list. You can pick up to 20.
- Choose a sort order if you want something other than the newest first. More on that below.
- Tick Group by notebook if you want a heading per notebook.
- Click Insert.
The list appears in the note straight away:
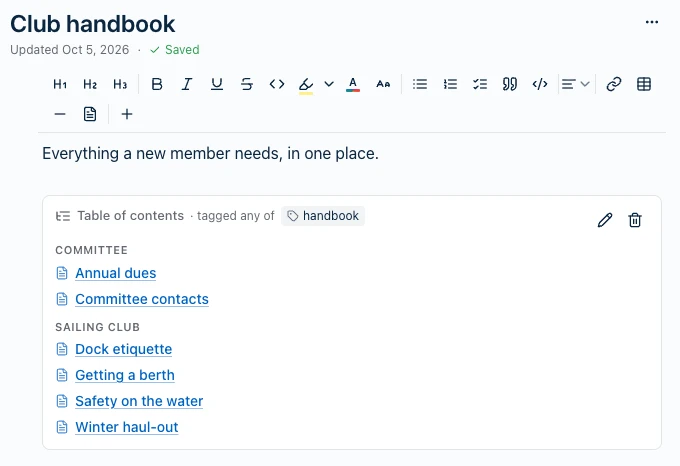
Click any entry to open that note.
More tags means more notes, not fewer
Pick two tags and you get notes with either one. Not notes that have both.
So recipes plus baking lists every recipe and every baking note. A note that has both tags shows up once. Adding a tag never makes the list shorter, which is why the picker says “Notes tagged any of…”.
Choosing the order
Sort by has three choices, each either way round:
- Date updated: newest first or oldest first. This is the default.
- Date created: newest first or oldest first.
- Title: A to Z or Z to A.
Title order ignores capital letters and accents, and it puts numbers in number order, so “Week 2” comes before “Week 10”.
Grouping by notebook
Tick Group by notebook and the list gets a heading per notebook, in alphabetical order, with each notebook’s notes underneath in the order you chose. If a note’s notebook has been deleted, it goes in a last group called Other notes.
Changing or removing one
In the top-right corner of the table there are two buttons:
- The pencil opens the same picker. Change the tags, the order or the grouping, click Save, and the list redraws.
- The trash can removes the table from the note. It doesn’t touch the notes it listed.
You can also click the table and press Delete, or drag it somewhere else in the note. Undo brings back a table you removed or changed.
It shows up to 50 notes
A table lists the first 50 notes in the order you picked. Pick a tag you’ve used on 3,000 notes and you get 50, with a line underneath saying which 50. For example, “Showing the 50 most recently updated notes.” or “Showing the first 50 notes by title.”
It never tells you the total. If you need every note with a tag, click the tag in the sidebar instead.
“The first 50” means first in your order. Sort by title A to Z and you get the first 50 alphabetically, not the 50 newest.
What it leaves out, and what it doesn’t
- The note the table lives in is never listed, even if it has the tag.
- Notes in the Trash are never listed.
- Every workspace counts. The table lists matching notes from all your workspaces, not only the one you have open, so the note reads the same wherever you open it.
- Encrypted notes are listed by their real title while your vault is unlocked. While it’s locked, they show as Locked encrypted note with a padlock, and they go to the end of a list sorted by title.
- A deleted tag stays in the table as a Deleted tag chip, with a line telling you to fix it. Click the pencil to remove it or pick another.
Two tables in the same note are completely separate. A table in a template works too.
Tables of contents on a public page
You can make a note public with a table of contents in it. Here’s exactly what readers see.
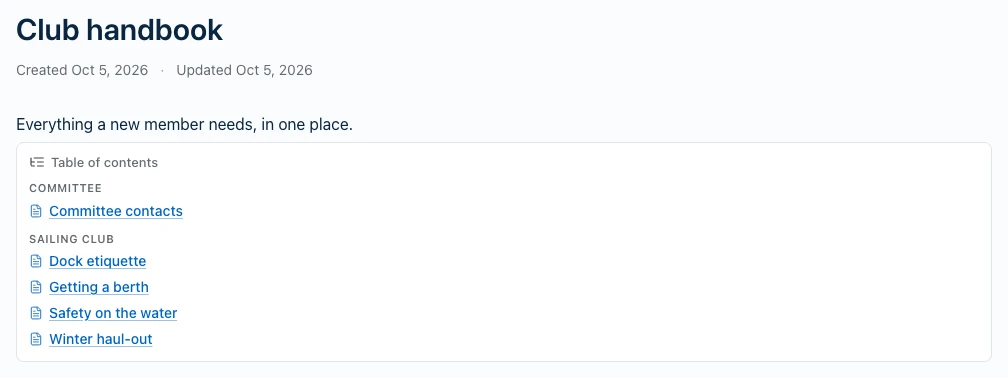
Readers see only the notes you’ve also made public. Every other note is simply absent. It isn’t greyed out, it isn’t a broken link, and there’s no “3 notes hidden” line. Nothing on the page, or in the page’s code, says it was ever there.
Here’s the Club handbook from above, published. Annual dues is still private, so it’s not in the list:
A few more things readers don’t see:
- Your tags. A public table just says “Table of contents”. The tags it’s built from stay private.
- Encrypted notes. They can’t be made public, so they never appear.
- Why a table is empty. If none of the matching notes are public, the table says “No notes here yet.” It reads the same whether you have no notes with that tag or a hundred private ones.
Harbor tells you before you publish
When you make a note public and its table includes notes that aren’t public, Harbor names them first:
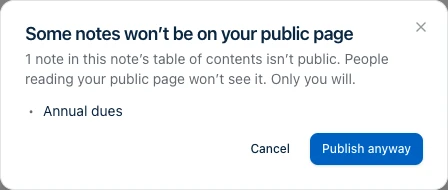
It’s a heads-up, not a block. Publish anyway publishes the note with those entries left out. Cancel publishes nothing. To include a note, make that note public too.
Only you see this list. It names your notes because you’re the one who owns them.
Harbor checks every time you publish. It also tells you if you add a table, or change a table’s tags, on a note that’s already public.
Which apps have it
Web, Mac, iPhone, iPad, Android and Windows. The picker, the words and the 50-note limit are the same on all six. On your devices the list builds from the notes already on that device, so it works offline.
Exports
If you export a note that has a table of contents in it, the list isn’t included. An export is a copy of what you wrote, and the list is something Harbor works out each time you open the note.
Related questions
Need more help?
Still stuck? Send us a message and a real person will get back to you.