How do I annotate an image?
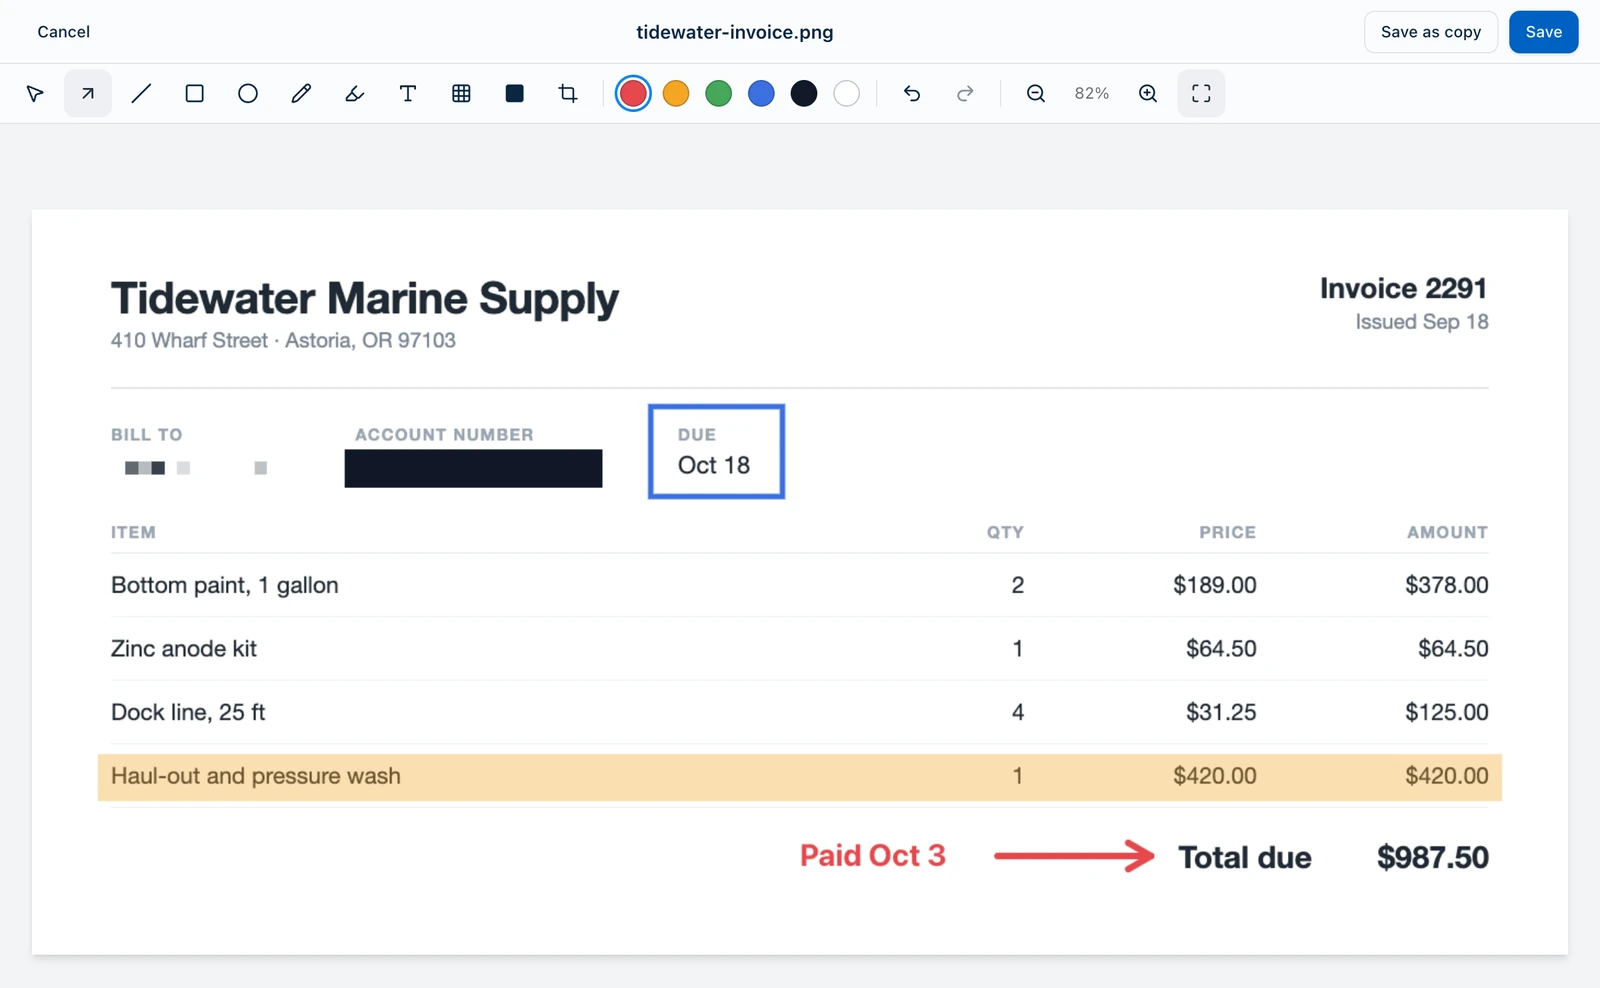
Find the picture in your note and pick Annotate. You get arrows, boxes, text, a highlighter, crop, and two ways to hide something private. It’s the same editor in every Harbor app, so what you learn on one works on the rest.
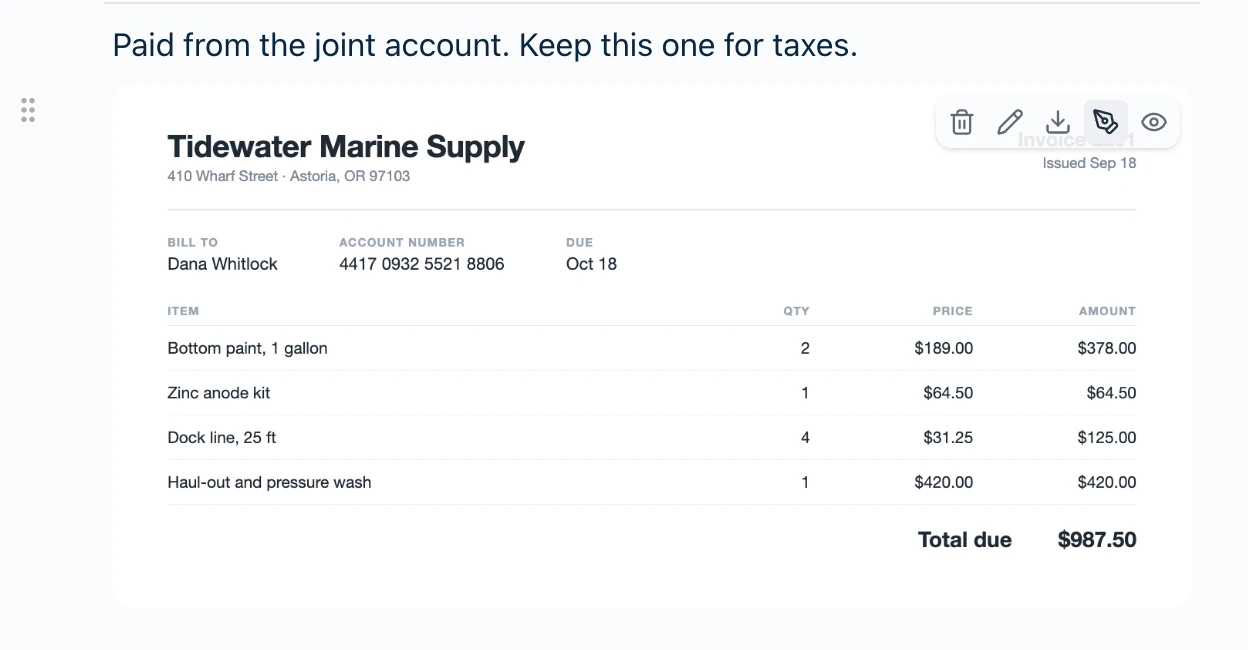
Where Annotate is
- On the web. Hover over a picture in a note. Annotate is the pen button, next to View.
- On Mac and Windows. Open the picture’s ⋯ menu and pick Annotate.
- On iPhone, iPad and Android. Tap the picture. A menu opens with Annotate, Open and Share.
On the web, Mac and Windows it’s also at the top of the viewer, for when you’ve already opened a picture to look at it full size.
You won’t find it on a note you can’t change: one that’s in the Trash, a clipped web page, or an encrypted note that’s still locked. Unlock the note and it’s there.
A picture over 50 megapixels is too big for the editor. The button stays, dimmed, and says “This image is too large to annotate (over 50 megapixels).”
The tools
They run left to right across the toolbar. On a keyboard, each has a key.
- Select (V). Click a mark to move it, resize it or change its color. Delete removes it.
- Arrow (A). Drag from the tail to the point. This is the tool you start on.
- Line (L). A straight line.
- Box (B). A rectangle around something.
- Ellipse (E). A circle or an oval around something.
- Pen (P). Freehand.
- Highlighter (H). Drag a box and it fills with see-through color. It’s a box, not a marker stroke.
- Text (T). Click where the words should start, type, and press Enter. Shift+Enter starts a new line.
- Pixelate (X). Drag over an area to break it into blocks.
- Redact (R). Drag over an area to cover it with a solid block.
- Crop (C). Drag over the part you want to keep.
There are six colors: red, amber, green, blue, black and white. You start on red.
Undo is ⌘Z or Ctrl+Z. Redo is ⇧⌘Z, Ctrl+Shift+Z or Ctrl+Y.
On a touch screen, one finger draws and two fingers zoom and move the picture. In the apps, once you’ve used an Apple Pencil or a stylus, the pen draws and one finger moves the picture.
Hiding something private
Redact and Pixelate are for the account number, the address, the face in the background. Redact covers the area with a solid block. Pixelate breaks it into blocks too coarse to read.
For text, use Redact. A solid block leaves nothing to guess at.
Then press Save. Save replaces the picture and deletes the original, so what you hid is gone for good. It isn’t sitting under a layer someone could lift off. Look the picture over before you press it.
Save as copy doesn’t do that. The original stays in the note, right above the copy, with everything still showing.
Two things can leave the original behind after a Save:
- The same picture is in another note. That note keeps it, even if the note is in the Trash.
- Harbor couldn’t remove it. You’ll see “The original image wasn’t removed,” with a Try again button for 30 seconds. Your marked-up picture is in the note, but the original is still in Files. This is what happens when you save offline on a Mac, iPhone or iPad.
So for anything sensitive, save while you’re online.
Save or Save as copy
- Save swaps the picture for the marked-up one, in the same place. If the picture is in the note twice, both change. The original is deleted, and Undo won’t bring it back.
- Save as copy puts the marked-up picture directly below the original and leaves the original alone. The copy gets “(annotated)” on the end of its name. It’s a new file, so it counts toward your plan’s file limit.
A PNG stays a PNG. A JPEG or HEIC photo is saved as a JPEG. Anything else is saved as a PNG, so an animated GIF becomes a still of its first frame.
Cancel, or Esc, closes the editor. If you’ve drawn anything, Harbor asks before it throws your marks away. In the Mac and Windows apps, ⌘S or Ctrl+S saves, and ⌘W or Ctrl+W cancels.
Three more things:
- Encrypted notes stay encrypted. The marked-up picture is encrypted the same way the original was.
- On the web, Android and Windows, Save needs a connection. Offline, you’ll see “Couldn’t save the image.” Your marks stay put, so you can try again once you’re back online.
- A picture has to finish uploading first. On Android and Windows, one you’ve only just added says “Still uploading” until it has.
Screenshot, then annotate, on Mac and Windows
Press a hotkey, grab part of your screen, mark it up, and it’s a note.
- Open Settings › Quick Capture and turn on Annotate screenshots before saving. It’s off until you turn it on.
- Take a screenshot with one of Quick Capture’s hotkeys. They work from any app, as long as Harbor is running.
- A region you drag: ⌃⌥⇧4 on Mac, Ctrl+Alt+Shift+4 on Windows.
- The full screen: ⌃⌥⇧3 on Mac, Ctrl+Alt+Shift+3 on Windows.
- One window: ⌃⌥⇧5 on Mac, Ctrl+Alt+Shift+5 on Windows.
- The screenshot opens in the editor, in its own window. Mark it up and press Save. Harbor files it as a new note.
There’s no Save as copy here. There’s no original to keep. Cancel gives you three choices: Save without marks, Discard or Keep editing.
With the setting off, a screenshot goes straight into a note. You can still annotate it from there.
On iPhone, iPad and Android
There’s no hotkey on a phone, so it’s three steps.
- Take a screenshot the way you always do.
- Share it to Harbor. On iPhone and iPad that’s Share, then Harbor, then Save. Here’s that with pictures. On Android, tap Share and pick Harbor.
- Open the note, tap the picture, and tap Annotate.
Coming from Skitch
If you marked up screenshots with Evernote’s Skitch, this is the same job: arrows, boxes, text and pixelate. Turn on the setting above, and a hotkey on Mac and Windows goes from screenshot to markup in one step.
The difference is where the picture ends up. It’s in a note, so it syncs to your other devices, and Harbor can search the words in it. Pictures in the notes you imported from Evernote work like any other. Web clips are the exception. They’re read-only, in Harbor and in an import.
The Web Clipper uses the same editor for screenshots of web pages.
Related questions
Need more help?
Still stuck? Send us a message and a real person will get back to you.